
Intro to Importing a Site
The site import tool enables you to bring in content from another website. Before using this tool, there are a couple important things to take note of:
- In the instructions below, the terms source and destination will carry the following meanings:
- Source: The website which content is being imported from.
- Destination: The NUsites website that content is being imported to.
- The importer only imports content (posts, pages, categories, tags, media, comments). It will not import settings, configurations, themes, plugins, menus, or other non-content entities. Users will not be imported automatically, so you must first import any users you wish to bring over manually (see Managing Users).
- Each importer works a little differently, and not all of them have the same capabilities to import various content metadata. Make sure to read the directions carefully for the importer you will be using below, if documentation is available – not all importers are supported by documentation.
- The destination site on NUsites must have its privacy / visibility set to public during the import (see Privacy / Visibility).
- All import instructions assume you already have exported any necessary content from the source site.
- When importing another WordPress site, the destination site that you are importing to must be a new site that you have not created any new content on.
- Imports can take a bit of time to completely process media file downloads. If after running an import, some of the images are missing or incorrectly sourced, try waiting 30-60 minutes for the background process to finish downloading images from the source site.
Import a WordPress or NUsites Site
- Make sure that the source site has its privacy / visibility settings set to public, so that media files can be downloaded during the import (see Privacy / Visibility).
- Select “Tools > Import” from the left dashboard menu of the destination site.
- Locate the row labeled “WordPress” and click the “Run Importer” link for that row.

- Click the “Choose File” or “Browse” button, and select the source site’s export file from your computer.
- Click the “Upload File and Import” button to proceed to the author assignment phase.
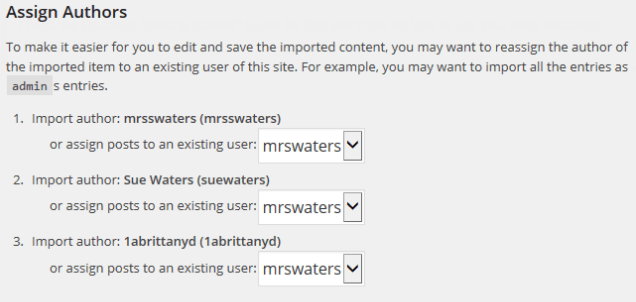
- On this screen, you will see a section title “Assign Authors” with a list of authors from the source site. For each author, you will be asked if you’d like to import them from the source site or assign their content to users in the destination site. You must assign all source users to a destination user. Because NUsites relies on NetID authentication, new users cannot be automatically imported. If some users of the source site are no longer needed, you can opt to reassign their content to another user of the destination site. Do not click submit after assigning all users.
- In the “Import Attachments” section at the bottom, make sure that the “Download and import attachment files” is checked. This will make sure that all images, videos, audio, and other uploaded files are downloaded from the source site to the destination site during import.
- Click the “Submit” button.
- A progress bar will appear while the import takes place. Do not close the browser window or navigate away from the page until the import is complete.

- Wait for the progress bar to complete and for the “All done. Have fun!” message to appear. This message indicates the the import is complete, and that you can finally leave the page.
- You can now begin customizing your site with themes, plugins and custom settings.
Import Posts from a Blogger Site
- Export the source site from Blogger.
- Login to the source Blogger site dashboard.
- Select “Settings > Other” from the left dashboard menu of the source Blogger site dashboard.

- In the top right corner of the “Blog Tools” section, click the “Export Blog” link. This should cause a pop-up to appear like the one depicted below.
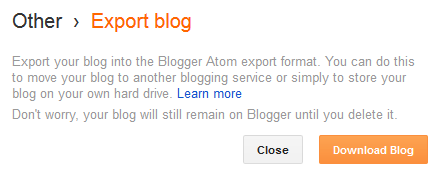
- Click the “Download Blog” button to save the source Blogger site export file to your computer. You are now ready to proceed to the import process.
- Select “Tools > Import” from the left dashboard menu of the destination site.
- Locate the row labeled “Blogger” and click the “Run Importer” link for that row.

- Click the “Choose File” or “Browse” button, and select the source site’s export file from your computer.
- Click the “Upload File and Import” button to proceed to the author assignment phase.
- On this screen, you will see a section title “Assign Authors” with a list of authors from the source site. For each author, you will be asked if you’d like to import them from the source site or assign their content to users in the destination site. You must assign all source users to a destination user. Because NUsites relies on NetID authentication, new users cannot be automatically imported. If some users of the source site are no longer needed, you can opt to reassign their content to another user of the destination site.
- Click the “Submit” button.
- A progress bar will appear while the import takes place. Do not close the browser window or navigate away from the page until the import is complete.
- Wait for the progress bar to complete and for the “All done. Have fun!” message to appear. This message indicates the the import is complete, and that you can finally leave the page.
- You can now begin customizing your site with themes, plugins and custom settings.
Import Links / Subscriptions from a Blogroll (OPML) File or URL
- Make sure that the source site is publicly visible on the web.
- Select “Tools > Import” from the left dashboard menu of the destination site.
- Locate the row labeled “Blogroll” and click the “Run Importer” link for that row.

- Either provide an OPML file URL or use the “Choose File” or “Browse” button to select a source Blogroll export file from your computer.

- In the “Category” field, select a link category into which the links from the source will be categorized on the destination.
- Click the “Import OMPL File”.
- Wait for the “All done. Have fun!” message to appear. This message indicates the the import is complete, and that you can finally leave the page.
- You can now begin customizing your site with themes, plugins and custom settings.
Export a Site
You can export a copy of your site’s content into the WP XML format. This file can be used to import your site content into another WordPress site. The export file created contains only content, and does not contain themes, plugins or settings. It contains links to images, but does not contain the image files themselves. Image files will be downloaded from the source site upon import into a new site.
To create an export, please follow the steps outlined below:
- Select “Tools > Export” from the left dashboard menu of the site.
- Select from the list of possible export options in order to determine which content will be exported. Typically, the default option of “All Content” is the best, as it ensures no cross-linked content gets lost in the export process.
- Click the “Download Export File” button and wait for the export download to be completed.