
R workshops require both R and RStudio unless otherwise indicated.
Install or Access R and RStudio
Already have R installed?
As long as you have a recent version of R (4.3 or later), you should be fine. Earlier versions may also work, but the older the version, the more likely you will run into an issue. Note: The R version prints in the R console when it starts.
For RStudio Desktop, we recommend you use a recent version where the version number starts with 2023 or later, but unless you are taking a workshop on using Git, the version of RStudio will not have as much of an effect as the version of R.
Option 1: Install on your laptop
Prefer video instructions? Try Learn R Programming from Scratch: Install R, RStudio, and tour for beginners from Dr. Lace Padilla.
Install R first, and then install RStudio.
R: Install R
If you are installing R for MacOS, pick the version of R that is compatible with your processor. To figure out what processor type you have, click on the Apple menu in the upper left corner of your computer (the actual Apple icon), and choose About This Mac. If the information next to “Processor” includes “Intel” then you have an Intel Mac. Otherwise, you have an Apple silicon (M1/M2) Mac.
For Apple silicon (M1/M2) Macs choose the R install file ending with “arm64.pkg”. Optionally, if R for Apple silicon is not working on your M1/M2 machine, you can install R for Intel using a “x86_64.pkg” install file, and install Rosetta 2 to make it compatible with Apple silicon processors.
For Intel Macs choose “x86_64.pkg” files.
RStudio: Install RStudio Desktop (free)
After installation is complete, open RStudio to confirm your installation. You should see an R console window running R. If you installed R for Intel on an Apple silicon machine, you will be prompted to install Rosetta 2 the first time you open R or RStudio.
If you do not have administrative privileges on your computer, you may need to contact your local IT department for assistance installing R and RStudio. Please verify you have the ability to install packages as well. As an alternative, use option 2 or 3 below.
See Downloading from GitHub for instructions on downloading workshop materials from a GitHub repository.
Option 2: RStudio/Posit Cloud
Posit (the company that makes RStudio) offers RStudio/Posit Cloud to use R and RStudio for free through your web browser. See the Guide for more information on using the service.
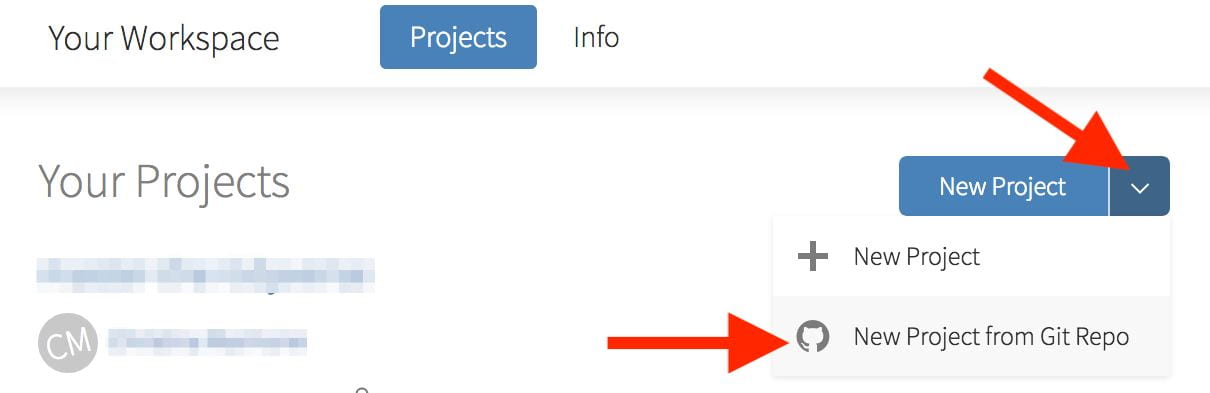
To get the workshop materials from GitHub into RStudio Cloud, create a new project directly from a git repository. In Your Workspace, create a new project: Click on the down arrow next to New Project in the blue button, then select New Project from a Git Repository. Provide the address of the workshop repository (the GitHub URL for the workshop). This will copy all of the files from this repository into your new project.
Option 3: Quest
Quest is Northwestern’s research computing cluster. It is available for faculty, postdocs, staff, and students engaged in research.
R and RStudio are available as part of the Quest Analytics Nodes. You need a Quest allocation (account) to access the Analytics Nodes; a Research I allocation is where you want to start if you don’t already have a Quest allocation.
Quest allocation requests can take several days to be processed, so you’ll need to apply for an allocation at least a week before your first workshop. You should log in to RStudio on the Quest Analytics Nodes before the workshop to ensure you’re able to.
To get the workshop files onto Quest, either download them from GitHub onto your laptop and then transfer them from your laptop to Quest as you do other files, or from within RStudio on Quest, make a new project from a Git repository (File > New Project > Version Control > Git. In the “repository URL” paste the URL of the workshop repository).
Install Packages
For all options above, you may need to install additional packages. Information on required packages may be sent ahead of time, may be listed in the workshop repository, or you may be asked to install additional packages during the workshop. For more detailed instructions, see Installing and Loading Packages from Danielle Navarro, and troubleshooting R package installs on Quest and Quest Analytics.
The tidyverse set of packages is needed for several workshops. It takes a while to install, so it’s good to install ahead of time. After installing R and RStudio, open RStudio. In the main console window, typing the following command at the prompt (type the command and hit Enter):
install.packages("tidyverse")

While installing tidyverse, if you are prompted with a yes or no question about compiling or installing from source, choose NO. Tidyverse is actually a large set of packages, so it can take a long time to install. Installation problems are common. If you run into issues, you can request a consultation for help, or come a little early to the workshop to get help from the instructor or a TA. You will see lots of messages, some of them in red text, while the packages are installing. This does not necessarily mean there is anything wrong.
To test the package installation, load the package by typing the following command at the console (type the command and hit Enter):
library(tidyverse)

If you get an error or different message than what you see above, the package may not have installed correctly. You can request a consultation for help or, for in-person workshops, come a little early to the workshop to get help from the instructor or a TA.