The Easy Table Buttons plugin adds tools for creating, editing and updating tables to the NUsites text editor. This allows for insertion of tables into page and post bodies.
Activate the Easy Table Buttons Plugin
- Click the “Plugins” menu item in the left-hand dashboard menu.
- Use the search box in the top right corner to search for “Easy Tables”
- Click the “Activate” button for the Easy Tables plugin.

Creating & Editing Tables
Once the Easy Tables plugin has been activated, a new Tables tool will be added to the site’s page & post editor. To use this tool, you can create or edit a page or post, and follow the directions below:
Create a Table
- If your editor is only displaying one line of icons, you must first click on the Toolbar Toggle icon, which is the second rightmost icon in the toolbar (see below). This will enable display of the advanced editing toolbar.

- In the second row of toolbar icons, you will now find a table icon dropdown menu, which can be clicked on to reveal table editing options.

- Using the “Insert Table” option, you can create a table with a specific number of rows and columns by using the grid tool. This will insert a blank table into the editor.

- You can now click into any of the cells of the table and add content to them.
Manage Rows and Columns
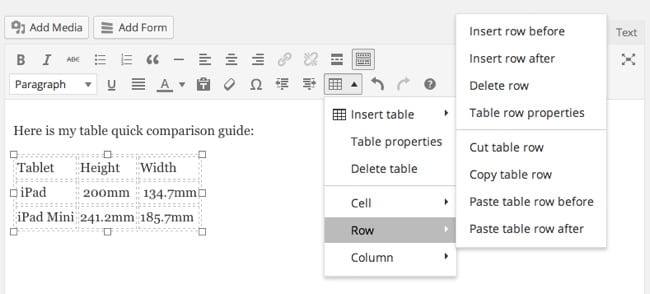
- You can insert, delete, cut, copy or paste rows using the tools available in the “Row” menu item of the table editor.

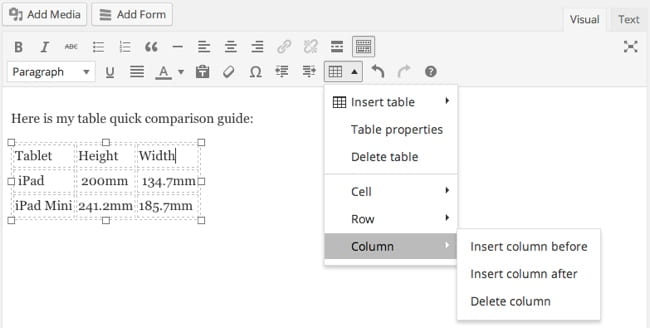
- You can insert, delete, cut, copy or paste columns using the tools available in the “Column” menu item of the table editor.

Formatting Table Cells
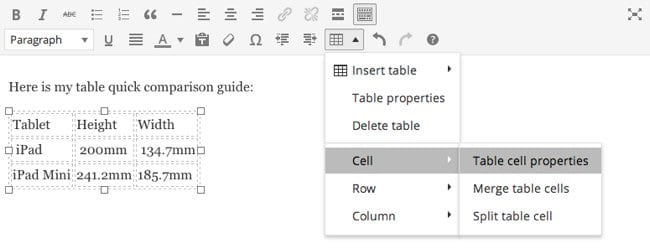
- Using the “Cell” menu item of the table editor, you can merge and split table cells, or optionally configure cell styles and formatting using the “Table cell properties” menu item.

Delete a Table
- Using the “Delete table” menu item of the table editor, you can delete the table from the editor.
